Continuously Deploying Your Infrastructure: How & Why
Published 04 October 2017
This post is based on my 10-minute lightning talk for Melbourne's DDD By Night of October 2017, with some more detail and discussion. If you're looking for the related code samples, they are located here on GitHub.
In this post I'll be discussing the benefits (and some pitfalls) of integrating Infrastructure-as-Code (IaC) tools with your Continuous Integration/Deployment (CI/CD) tools. I'll primarily be discussing the tools Terraform and Travis in particular, but I expect the learnings can be applied with any similar toolset.
Motivation
If you're not familiar with the concepts of Infrastructure-as-Code, let me provide a motivating example.
Consider your typical Continuous Deployment workflow: a developer commits some changes, which are picked up by a build server. The build server picks up these changes, builds them, runs all the tests if applicable, and once complete, deploys the built application to some kind of application server.
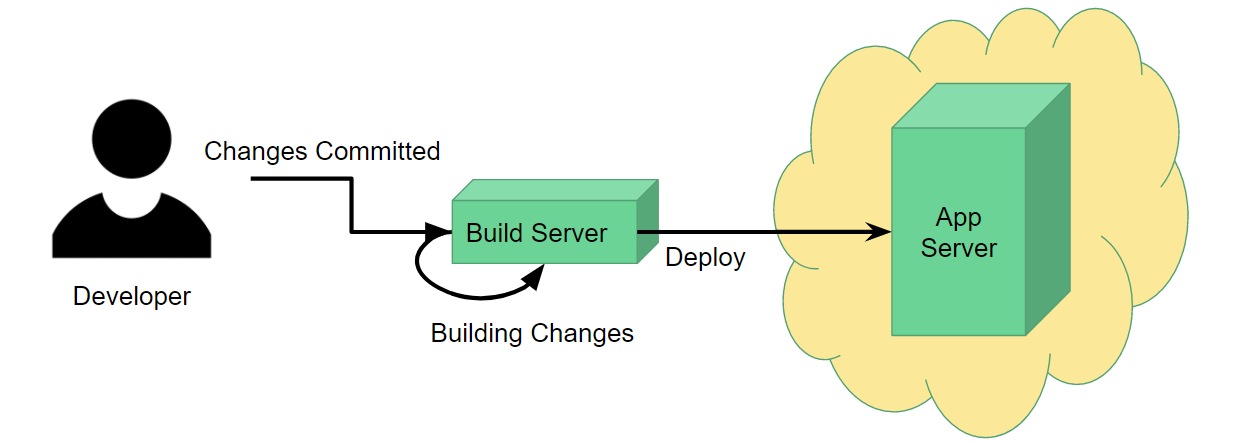
For this process to work, obviously you need to set up the application server beforehand. If you're using a cloud provider like AWS, this might be as simple as selecting the type of server and base system you want it to operate on (e.g. IIS on Windows Server 2012) and clicking Launch Instance. You only need to do this once, so you get it done and never have to worry about it again. Simple.
However, in real-life production scenarios, it may not be as simple as having one single application server. You could have several servers all running with the same configuration operating behind a load balancer to deal with high traffic loads. Furthermore, you might have this setup replicated across several geographical regions to serve different client demographics.
At this point, not only does setting the servers up manually take a long time, but if you later need to make some kind of configuration change, that's a considerable time investment too. It's also error-prone, since you might forget to make one small change to one or a couple of servers along the way.
Saving Yourself Time & Hassle
There are multiple ways to solve the problem of the manual work described above, but for this article I'll be focusing on Infrastructure-as-Code.
Infrastructure-as-Code refers to any tool that lets you describe your infrastructure (such as our load-balanced servers) in one or multiple files, and then have the tool automatically create/update your infrastructure for you by reading those files.
The main two tools I'm aware of that support this are Terraform and CloudFormation- I'll discuss Terraform in particular since I'm most experienced with that.
To give you an idea what Infrastructure-as-Code looks like, here's a very small Terraform snippet:
resource "aws_s3_bucket" "website_bucket" {
  bucket = "my_bucket_name"
  acl    = "public-read"
  policy = "${file("my-policy-file.json")}"
}
Any Terraform file will contain descriptions for a number of resources, such as an AWS S3 bucket in this example. Each resource will hold multiple attributes detailing how it should be set up, for example an appropriate name for your S3 bucket.
Once you've described all of your resources, the command terraform plan will give you a preview of all the changes Terraform needs to make (such as creating, updating, or deleting resources) to make your real infrastructure match what you've described, while terraform apply will go ahead and actually apply those changes.
Problem Solved! Right?
Well, yes and no.
Depending on exactly how you set up your Terraform configuration, rolling it out might be more complex than just running terraform apply. For example, a project I worked on involved:
-
One pre-rollout script to set up some dependencies
-
The terraform apply step
-
One post-rollout script to finalise our infrastructure
These 3 steps needed to be repeated across 7 deployment regions, each with 2 environments- **that's 42 manual steps **just to roll out our infrastructure! At this point, even though it's much faster than the manual route, updates to our infrastructure became quite tedious and could easily take a developer half an hour.
As usual, there are a couple ways we can solve this new problem. One way would be to script out this whole process so a developer need only run one or two scripts to rollout every region- and this would be quite reasonable. But it also got me thinking: could we leverage our existing continuous deployment workflow to take care of this infrastructure rollout for us instead?
Combining IaC and Continuous Deployment
You see, we already have a build server that automatically deploys our code whenever we change it. Thanks to Terraform, our infrastructure itself is now code that sits alongside the rest of our application code without distinction. So, why not utilise the build server to roll out all of our infrastructure as well as just the application? Why not make it responsible for the entire lifecycle of our application, from creation through to end-of-life, instead of just updating it in the middle?
The more I thought about this, the more I realised the benefits to this could go beyond just avoiding manual workload. In particular, it allows us to:
-
Validate our infrastructure configuration as part of our build results (and fail the build if it's invalid)
-
Accommodate easier code reviews of infrastructure changes
-
Help ensure committed code and the live infrastructure are always in sync
Trialing It Out: Creating an S3 Website
To prove out this idea, I decided to implement an integrated IaC/CD workflow for the simplest possible project I could think: a static HTML website hosted in an AWS S3 bucket.
Now, when I say simple, I mean simple: we're going to have a single "Hello World" web page sitting in an S3 bucket without any configuration for domain names or CloudFront distributions or anything remotely fancy. You'll be able to access the bucket URL, see our glorious "Hello World!" and that's it.
To do this, I used Travis CI because it integrates well with GitHub to get a new deployment workflow up and running quickly and easily.
The first step was to set up my Terraform config to create the S3 bucket and configure it for website hosting. That's accomplished by the following code:
provider "aws" {
  region = "ap-southeast-2"
}

variable "website_name" {
    type = "string"
    description = "Name of the S3 bucket and website to create, e.g. 'hello-world.com'"
    default = "hello-world.com"
}

terraform {
  backend "s3" {
    key    = "ddd-by-night-oct-2017/terraform.tfstate"
    region = "ap-southeast-2"
    bucket = "chrislewisdev-terraform"
  }
}

#The file 's3-website-policy.json' contains a boilerplate public-access policy for our website bucket.
#This template_file block inserts our website name into the policy so we can use it when creating our bucket.
data "template_file" "s3_website_policy" {
  template = "${file("s3-website-policy.json")}"

  vars {
    bucket_name = "${var.website_name}"
  }
}

#This creates our bucket with a public access policy and minimal website config.
resource "aws_s3_bucket" "website_bucket" {
  bucket = "${var.website_name}"
  acl    = "public-read"
  policy = "${data.template_file.s3_website_policy.rendered}"

  website {
    index_document = "index.html"
  }
}

#Once terraform has completed, it will display the value of this output variable.
#You can access this URL to see your deployed website!
output "website_url" {
  value = "${aws_s3_bucket.website_bucket.website_endpoint}"
}
If you'd like more information on what each part of this file means, feel free to consult the Terraform documentation.
I will however point out the importance of the backend configuration accomplished by the terraform {} block near the top of the file. Terraform requires a backend in order to store information about your infrastructure; this lets it "remember" what your infrastructure looks like between every time you run it. It is possible to use Terraform without a backend, but that requires that information to be stored on your local drive, and since we'll only be running Terraform with Travis, it'll be running on a different server every single time it runs- so having a remote backend is an absolute necessity for this workflow.
Now, to actually roll out this Terraform config and deploy our site to S3, we require the following Travis configuration:
notifications:
  email: false

#Install a Terraform executable locally
before_install:
  - wget https://releases.hashicorp.com/terraform/0.10.6/terraform_0.10.6_linux_amd64.zip
  - unzip terraform_0.10.6_linux_amd64.zip

#These two steps will effectively validate our terraform and output a list of any changes to be made to our infrastructure
script:
  - ./terraform init
  - ./terraform plan

deploy:
#Roll out any terraform changes required
- provider: script
  script:
    - ./terraform apply
  skip_cleanup: true
  on:
    branch: master

#Upload our website contents to the S3 bucket that terraform created
- provider: s3
  access_key_id: $AWS_ACCESS_KEY_ID
  secret_access_key: $AWS_SECRET_ACCESS_KEY
  bucket: "hello-world.com"
  region: "ap-southeast-2"
  local_dir: website
  on:
    branch: master
This Travis script outlines the 4 major steps that make this entire setup work:
-
Install Terraform. Since Travis runs builds on Linux architecture, all we need to do is download the official Terraform archive for Linux and extract its contents. Once this is done, we can invoke Terraform commands using the local executable file we downloaded.
-
Validate and Preview Changes. In order for the build to pass, we want to make sure that the Terraform configuration is fully valid, and we also want to see a preview of what will actually change in our infrastructure before we merge any code into master. terraform init is just a required step to start using Terraform, while terraform plan will perform both the validation and preview steps.
-
Rollout. When any code is committed or merged into the master branch, we want to apply our infrastructure changes so that the live infrastructure is synced up with the latest code. In this example, running terraform apply on our first master build should take care of creating the S3 bucket for our website.
-
Deploy. Finally, just like any normal deployment process, we need to finally deploy our website files to the S3 bucket that Terraform created for us. This is the same as any regular S3 deployment in Travis.
With all of that in place (and some AWS credentials provided to the Travis build), we're all set to have our infrastructure rolled out automatically by our build server! But don't just take my word for it: see one of the builds in action.

Reaping The Benefits
So, now that we've set up our infrastructure for continuous deployment, we can start to observe the benefits I described earlier. Obviously, there's the reduction of manual workload (which in this example is quite minimal), but even in this small example we can see everything else that I was talking about.
Infrastructure Validation
Now, whenever someone creates a pull request against this repository, the build results can tell us whether or not their infrastructure changes (if any) are valid. Suppose I asked you to review the following change:
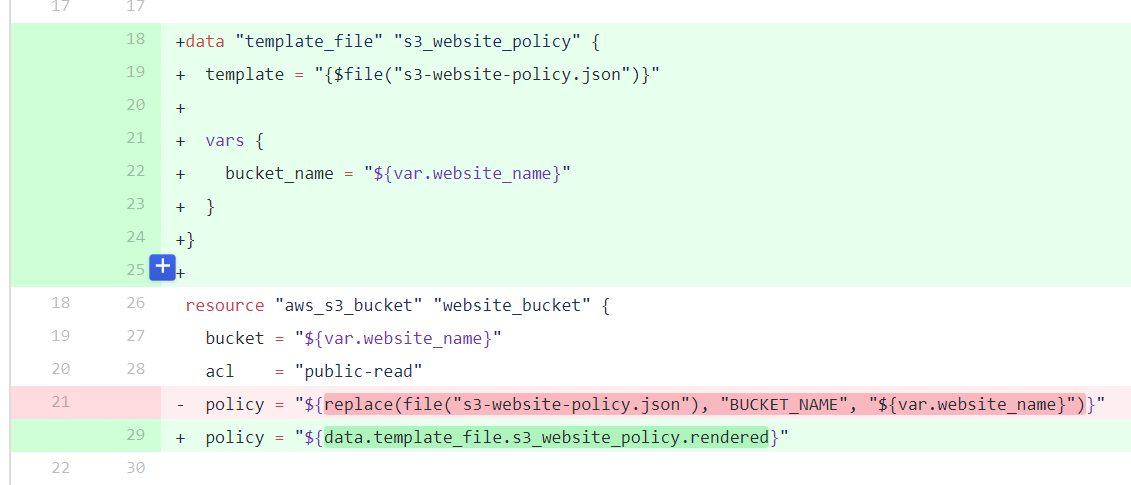
You might well be thinking "Gee Chris, I'm not too great with this Terraform stuff, your change looks pretty much OK but to be honest I have no idea what it does or if it's even valid!"
To be perfectly honest, even as someone who knows how to use Terraform, I find code reviews like these more difficult to parse than regular code because its effects are not always as easy to follow.
However, now that our Travis build is fully aware of our Terraform infrastructure, it does all the validation for us! In fact, this particular change yields a build failure, the cause of which can be seen in the build output:
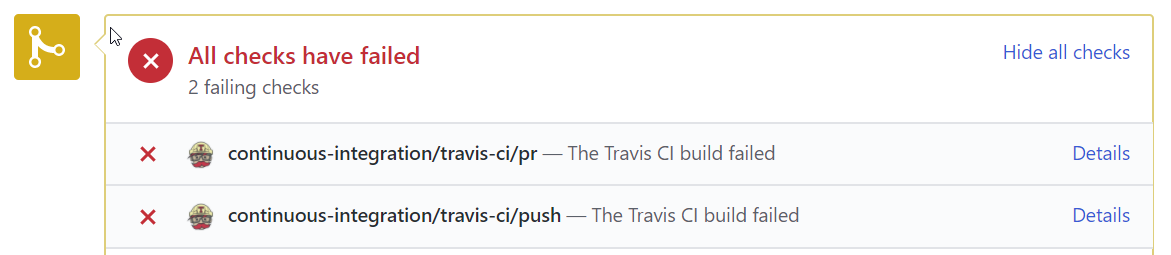
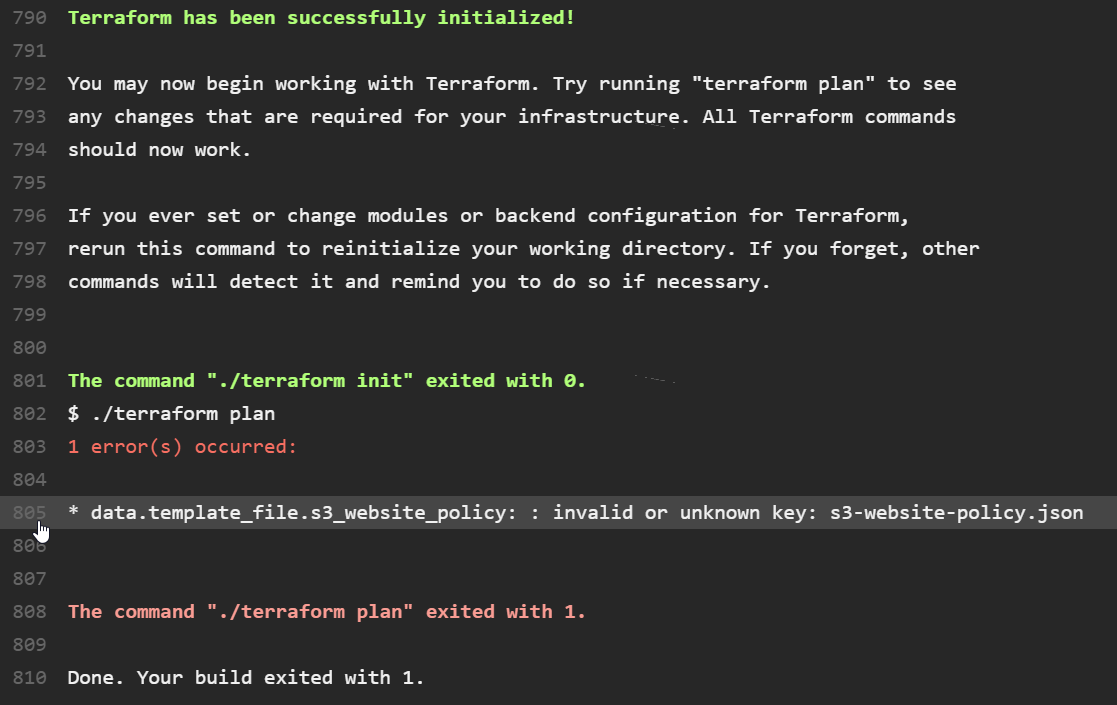
Now that you can see that I've obviously broken the build, you can call me out on my error- I probably made some last-minute changes and forgot to re-test before sending out my pull request. On closer inspection, I realise all I did wrong was get a '$' sign the wrong way around, and with this fixed, the build goes green!


Reviewing Infrastructure Changes
As a team, you want to make sure any infrastructure changes that get rolled out won't have any adverse effects, such as breaking changes for dependent projects or unexpected downtime for your service. Assuming a developer is responsible for rolling out Terraform changes, this is only really possible by showing someone else your terraform plan output, or maybe even copy-pasting it into chat for review.
Having our terraform plan output as part of our build process means that now, anyone reviewing a pull request can check exactly what will happen if you commit your code to master:
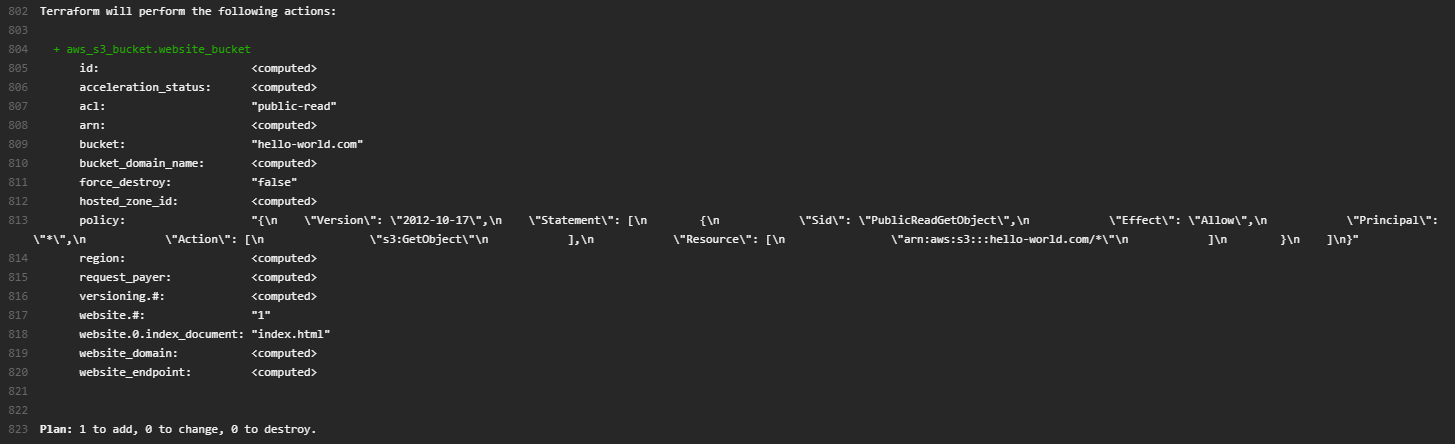
This facilitates a better team discussion around the impact of your changes, and can hopefully give the team better confidence in all infrastructure changes to be rolled out- which is especially useful since the automatic rollout won't have a developer baby-sitting it the whole time.
Now, presumably with the reviewers' blessing, we can land our code and see these changes applied to the live environment.
Words of Warning
As much as I would like to tout this setup as being a perfect solution, I feel like there are definitely some potential pitfalls worth pointing out that this example does not address.
Infrastructure Change Previews are a Point-In-Time View
What I mean by this is: if I create a pull request, and Travis generates a Terraform plan for infrastructure changes, that output is only applicable for the exact point in time that the build was run.
This means that if you create a pull request, get it reviewed and approved, but wait a month before merging it into master (for whatever reason), there is no guarantee that your infrastructure changes will work, because your live infrastructure could have changed between then and now.
You face the same problem if you have several pull requests pending at once that contain infrastructure changes. The build output for each pull request will only be relevant for the existing infrastructure when it was created, but as each one is merged, it will be changing your live infrastructure and potentially impacting every other pull request.
For this reason, the output of terraform plan should only ever be considered valid for a very small time frame (a couple days at most). In this example, it is purely up to the developer to make sure you have verified your changes recently before merging into master.
Passing Builds Do Not 100% Guarantee Your Changes Will Work
Terraform does have a small downfall in that you never know 100% for sure that your infrastructure will successfully be built until it's actually been completed.
Imagine you create a Terraform file to create an S3 bucket called "hello-world.com" exactly like I did in this example. Terraform will look at your configuration, validate it, and say that it is fine. It will tell you that a bucket called "hello-world.com" needs to be created and give you the all-clear to do so.
However, when you run terraform apply, this will produce an error because every S3 bucket name needs to be globally unique, and I've already taken it. Terraform currently has no protection against mistakes like this, so even though your pull request builds would be green, once committed into master you would realise your code is actually broken.
It's not difficult to see how this could cause some headaches when code has already been committed into master and is breaking the build with no warning. Unfortunately it may just be a risk you have to take if you pursue this type of setup.
Wrapping Up
All in all, I consider this a pretty successful experiment in applying Continuous Deployment workflows to Infrastructure-as-Code tools. I may not have had an opportunity to apply this to any production projects yet, but I honestly think this example proves all I need to justify adopting a similar approach on a real project.
Even if there are concerns around automatically having infrastructure changes rolled out, there is great benefit in even just validating and previewing infrastructure changes as part of your build, and I would hope this can become a common practice for teams using Infrastructure-as-Code tools.
If you haven't already, do check out the code samples and maybe even try setting this project up in your own account!
Thanks for reading!